
This costume works for both adults and children.
Continue after the break for the full tutorial.


- Black pants and shirt
- Black ski hood
- 2 yards squishy ‘backer rod’ (from hardware store)
- 2 pieces felt
- 2-3 yards harness material
- Baby pacifier
- 2 buckles/clips
- 2 tunafish cans (or [better yet] spray-painted foam blocks)
- Silver paint
- Bottle of soda
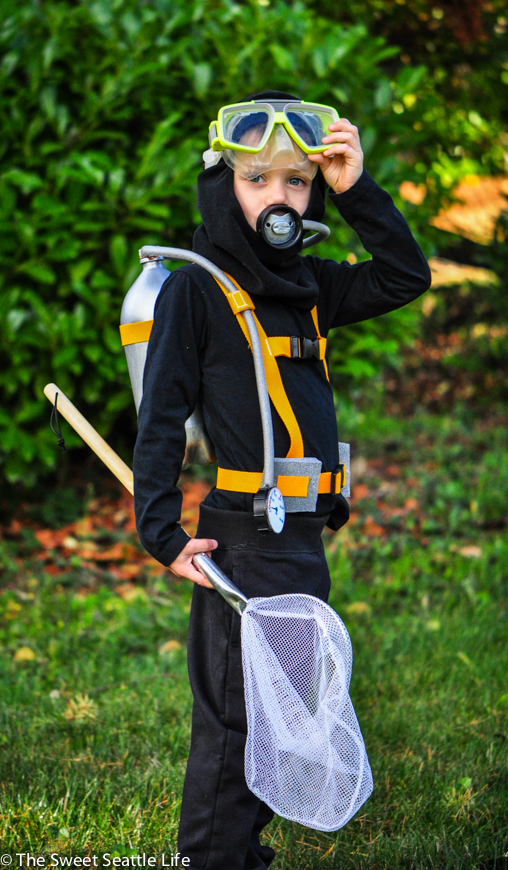
- SCUBA mask
- Plastic plumbing connector (from hardware store)
Optional
- Fishing net
- SCUBA chart (and clip for attaching to belt)
Equipment
- Sewing machine
- Glue gun
- Hand saw (for plastic plumbing piece)
- Sand paper
- Printer/cardstock/scissors
- Fins: Sewable velcro (4”), fabric interfacing, elastic (20”)
Harness
Begin by measuring your child/adult for the harness. I used three separate pieces of harness and sewed them together.

Add in the waist and chest buckles.

Air Tank
Rough up the ‘tank’ with a fine grade sandpaper (100 or 150). This will help the paint to stick. Paint soda tube a nice shade of silver. Add a band around but note that hot glue will warp the fragile plastic of your tube (trust me on this).
The backer rod is a weird find from the hardware store. It’s a foam-y like material that is used for stuffing into crevices to prevent air flow. It was $5. You could also substitute black tubing. In this case, the hardware store is your oyster: so many possibilities.
Hot glue two 1-yard sections of backer rod to the top of the bottle. One will be your regulator, the other will be your air gauge.

Air Gauge and Regulator
I walked around the hardware store until I saw something that looked vaguely like a air gauge. There is no perfect part here so feel free to improvise. I ended up cutting my plastic plumbing part in half; one side became the air gauge, the other turned into the regulator. A simple handsaw will usually cut the plastic.
Here are the two halves: reg on left (with binky) and gauge on right.

Paint the pacifier silver (again, a light sandpaper job helps) and then jam it into the plastic casing. Hot glue it in place.


Print out this template (it might take a few tries to get an appropriately-sized image)

Glue the paper onto cardstock or cardboard. I also had a laminate sticker that I placed over the top for additional durability. Cut to size and glue onto the gauge face.

Measure and glue ends of the backer tubing to the regulator and gauge. Sew a little clasp with velcro onto the harness to hold the air gauge in place.
Fins
Cut out two ‘flippers’ from the felt. They should not extend much past the end of the shoes. Fabric interfacing fused to the bottom side of the fabric can be useful in giving the felt a bit of structure. Add velcro closures to the backs. Sew two ‘ridge lines’ down the middle of the flippers. Add elastic loops to the middle/front of the fins. These will slip under the shoes and hold the front of the fin in place.


Weights
I started out with tuna cans but then switched to two blocks of foam as they weren’t quite so bulky as the cans. These measure roughly 2.5”x2.5”x1” (thick). They are painted silver and have a small section of strap material glued down to make it look as if the harness goes through the weight.

Optional: Add a fastener for the dive chart. You can download and print a chart here. Glue it to a cardboard and laminate for extra durability.

That’s it! Go forth little Open Water Diver!!
xo,
Sonja